Batch Processing
Transactions can be generated in batches, with summaries saved as PDF reports. These can be exported from edge as zipped files, and imported into Financial Manager (FM).
Processing a batch and managing finance data export
I'm wanting to Export financial data.

Export to Xero (to enable this functionality talk to Xero for your 'network key' required in edge finance > configuration).
Banking Batch Processing
-
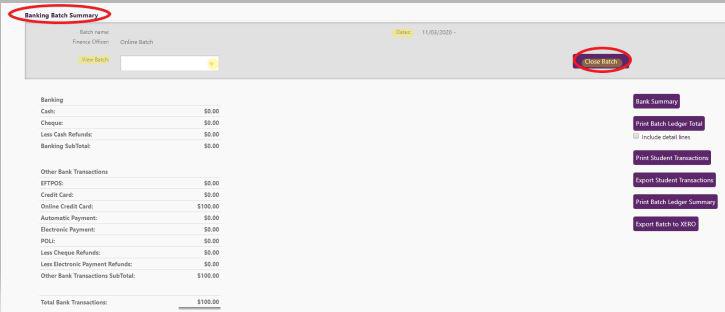
The current batch automatically generates banking totals of transactions for display, until you 'Close' it. In closing a batch a new one is auto created with the next consecutive number and ready for use. While the batch is live, there is a running total of the banking and electronic banking income totals together with refund summary. Once a batch has been closed the end-date is automatically inserted.
-
Previous batches can be viewed if required, completing the 'View Batch' field. Do not have anyone processing any payments in edge while prior batches are open for viewing, to avoid allocation to the incorrect batch.
-
The Print buttons (summary, ledger total and student transactions) produce PDF reports:
- Bank Summary is the current (or selected Batch) Batch Summary report for printing if desired, broken into payment types, refunds etc.
- Print Batch [ .. ] Ledger Total report displays sub-totals for ledgers, rather than individual transactions for confirming data imported into Financial Manager; and write-offs. The Unallocated Credits total displays at the bottom of the Batch Ledger Report
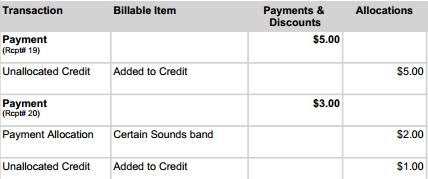
- Student Transactions breaks the batch down into transactions by student. In addition, the Student Transactions report's ‘Allocations’ column shows how payments are allocated to billable items. If necessary, print this page using your browser File menu > Print
An example payment of $5 is made, showing below in bold in the ‘Payment & Discounts’ column. It has not been allocated to any billable item, so $5 is shown in the Allocations column as having been added to Unallocated Credit. The receipt number displays under "Payment" in the Transactions column.
A further payment of $3.00 has been made, shown in the ‘Payments and Discounts’ column in bold. $2.00 of this payment was allocated at the time to an item (Certain Sounds band). This is shown as a Payment Allocation of $2.00 in the Allocations column. The remaining $1.00 is shown in the Allocations column as having been added to Unallocated Credit.

![]()

Having clicked 'Print Student Transactions' to generate the PDF, the above columns show the Transactions to GST columns from the Student Transaction batch report.
Items can be paid by allocating from the available Unallocated Credit which will be shown in the transaction Allocations column only, using the Allocate Credit tab on the payment page.
Export student transactions data to CSV file
- For a CSV export file of student transactions which will be sorted by receipt number, click 'Export Student Transactions'.
Export to Financial Manager (FM)
Automatic exporting
From version 14.4 onward of FM, it's possible to set up MUSAC Accounts to automatically pick up your batches from edge. Setup must be completed in FM Accounts.
- Main Menu > Setup the package
- Specify Application Details
- Page 4
Manual exporting
- Batches are listed with start and end dates, together with export date and ability to download where this has been carried out.
- Create a new sub folder in your MUSACACC folder for saving the zipped files exported from edge.
- 'Export to file' and save the zip file into the new MUSACACC sub folder.

- Extract the files into the main MUSACACC folder for import into Financial Manager. If any batch includes more than 400 transactions, more files will be prepared.
- Rename "*DpBatch.dat", where the asterisk is the letter of the account application. This batch file is then ready for upload into Financial Manager. The person responsible for Financial Manager will be prompted from the program that this file is ready for import.
- The batch files must remain in order, and only be imported once.
Export to Xero
Automatic exporting
To automatically pick up your batches from edge, setup must first be completed in Xero, with the added feature of importing the ledger numbers from Xero's Chart of Accounts. This requires manually setting the 3 accounts at the top of the Main ledger numbers page. For Xero schools, the field "Unallocated Credits" is editable in Xero, so if your school calls this "Income in Advance", this will be reflected on the ledger summary report - if labelled "Unallocated credits", this is what will display.
To set up in XERO:
-
Identify the three Special Accounts
Bank Account Type: BANK where the income is deposited;
Bank Account for Income in Advance, Type: CURRENT LIABILITY where the income is received, but not allocated to Billable Items
Bank Account for Clearing Account, Type: CURRENT LIABILITY interim account used in the "Export Batch to XERO" process (showing overall Zero).
- Identify revenue accounts to be used in edge
- In General Settings, identify the XERO Network Key (OrgKey)
- Edit ledger numbers in edge to match XERO (for successful synchronising)
- In edge enter 'Special Ledgers' and to synchronise accounts, the Maintain Ledger Number page displays a "Connect to XERO" button, and displays a message confirming when the accounts are successfully synchronised.
Click on Video for further information.
Looking for more answers? email support with your question.