Creating an Automatic Timetable
With the edge Timetabler user responsibility, Timetable > Configuration leads you to setup including checklist for the automated timetabling process.
Creating a timetable process
The Create/Edit timetable page enables you to either create a new timetable, or edit an existing one. Using the 'Copy' button you can re-use previous settings for a new timetable. The timetabling process involves steps beginning with defining your academic year with start and an end date, followed by timetable structure and edge displays a checklist on the pre-requisites (Setup) page. The timetable has a maximum of 12 days and 10 periods per day. The automated process uses a mask - algorithms to assist with creating balanced option lines and classes based on staffing and student course requests entered.
-
Provided you have been allocated the edge responsibility 'Timetabler', see Timetable > Configuration > Create/Edit Timetable page
-
A timetable checklist is provided identifying the pre-requisites in order to set up a timetable, and record that these have been actioned. The Timetable setup page contains the required detail before starting to create a timetable, with the tick boxes provided as a reminder of the tasks already completed so far.
It is possible but not desirable for a timetable to be created without having assigned teachers to Location/s.
The Create/Edit page contains the steps in order for successfully creating a timetable. Summary information is provided for each section to show current status. Click the hyperlink to take you to the relevant page to amend any data as required.
Step 1. Configuration incorporating Basics, Bands, Cycle Periods, Period Times and Connect Option Lines.
Step 2. Edit Student/Teacher/Courses
Step 3. Option Lines 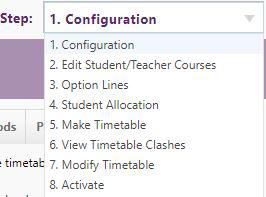
Step 4. Student Allocation Students and Classes
Step 5. Make Timetable
Step 6. View Timetable Clashes
Step 7. Modify Timetable
Step 8. Activate incorporating Calendar & Dates
Timetable Setup Wizard
Step 1. Configuration
Basics
The basic new timetable structure is determined with number of days in cycle, and number of subject periods. The number of days for the timetable cycle cannot be edited in an existing timetable, however the maximum number of subject periods held within the week day, or cycle day, can later be reduced.
Note: To have a new form class (and any changes made to classes eg. rooms) appear in the timetable, save and activate again.
To create a timetable:
-
select the calendar year
-
name the timetable appropriately, eg. '2016 Semester 1'
-
enter the number of days in a school cycle; and
-
the maximum number of subject periods in a given day (Note: you can reduce individual periods as required later)
-
When you have entered the above details, click Save
-
Click the Automatic button for the automated process - once saved, a purple banner shows you're in the automated process
Bands
A band is a collection of year levels, the timetable defaults to all year levels within your school to being in one band.
To group students together, you can create individual bands, eg. juniors, seniors, or those year levels who share time together (assembly). To do this, add another band, name it appropriately, and define which year levels are included. Ensure all the relevant year levels are included within one band.
Cycle Periods
The cycle page reflects the grid structure chosen on the Basics tab (configuring the basic structure). As default, all periods on each day of the cycle are active (ticked).
To remove periods from timetable display within a timetable band, untick the period to remove, and Save.
Period Times
To set up or edit period times, drag and drop the labels from the left side on to the grid. Lunch and break times, assemblies are included in the categories. Once the label has been dragged onto the grid, it can be adjusted vertically to give the correct time length. If the Monday structure is, for example, indicative of the rest of the week, you can copy it across to the other days using the link. You can still edit and change period times throughout the cycle after this. For example to change period times for winter, do this by modifying the relevant timetable.
Save your settings as you go (as you would for a large document.) Ensure it is configured for each day, and for each band.
Connect Option Lines
Now you have collated subjects by option lines (defaulted to the A-F naming pattern), you can state which option lines are to take place on a given day and period. You can view individual year levels by clicking the appropriate link. Save these settings.
Step 2. Edit Student/Teacher/Courses
Student and Teacher tabs
The second step in the timetable process (for provisional students in courses only) shows a collation of courses a student has selected. This step opens by default on the Students tab for course selection, where they can be filtered by year level and/or the course that is associated with the student.
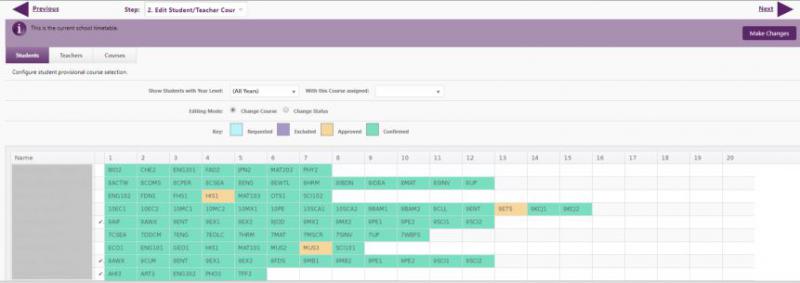
The following status types are available to show:
Requested: The student entered this through the Student portal
Approved: The Assessment Coordinator or Timetabler has approved the student doing this course.
Note: Compulsory courses are automatically approved.
Excluded: This status provides for compulsory courses where the student is NOT to be allocated the course during timetabling.
Confirmed: The student is currently in a subject class for that course. This status is derived from the data, and cannot be assigned.
By clicking in the cell, courses can also be selected for the student - colour indicates this student has reached the course number for the year level previously set. To distinguish between students with the same name, the Form Class is included in the table.
- To change a form class teacher where no clashes or other classes are impacted, change the teacher in Define Class.
- To change the teacher on a class, where the change will generate timetable clashes, modify the relevant timetable.
- To change classes for an individual student into an existing class, change the student membership from Student Details.
Course tabs
A mask is where you indicate the lines where a subject can be placed. The 'masking' process specifies the lines in which the various option classes may, or may not, run eg. if you have 6 11MAT classes, do you wish to run them over 6 lines or 3 lines with 2 classes in each. Note that the timetable can put courses into those slots, taking the best fit determined on the weighting. Create your Mask noting: Number of classes (Cls) and mask details are editable. You can create as many versions as you require.
Choices are:
- Y = Subject class COULD appear on line
- N = Subject class preferred NOT to appear on line
- - = Subject class MAY appear on the specified line
Click on the "All Courses" row to change the default setting for all courses on the option line.

The 'Students' column shows the number of students found taking each subject. If a subject has NO students but is listed, then the zero indicates that the course was found with Teachers only.
Pre-requisites for Student Allocation are: Step 2 Student course options have been applied to students, teachers added to course, and Course Mask has generated option lines.
The 'Teacher' column indicates the number of teachers that were found on the course.
The 'Pref. Size' column indicates the size of each class if the program can produce perfectly balanced lines. Note that there are to be 2 10GER classes for the 45 students. The 'Size' column shows the highest class size, derived from Courses data.
The 'Lines' column shows the number of lines the course is to run in.
The 'Cls' column shows the number of classes you wish to run for each subject. It defaults to the number of teachers found. It can never be less than the number of teachers found but may exceed the number of teachers. If you make the number of classes less than the number of lines you have specified in the Lin Column then the number of lines is automatically reduced. To create lines based on your mask, click "Generate lines".
Step 3. Option Lines

Here subject classes are grouped into option lines for each individual year level. The subject class filter allows selection of year level(s), OR Course(s), OR Subjects(s) with multiple values in the same category (subject level or course or subject). This can be modified by dragging the subject class between option lines. Save each Year Level as you add classes to them.
Empty lines can be hidden from view using the check box. For good practice save after you have completed each year level.
NB. classes are auto-named based on their course, line and teacher combinations.
To rotate option lines (eg. for the new term), modify the relevant timetable using spare lines.
The following option line filter shows the selected option line field, including version date and time - listing versions alphabetically, but displaying the confirmed option line, or most recently saved. Option lines have to be confirmed by ticking the "Confirmed" checkbox once you're happy with the grid to carry on with for each next step in the process - confirm your choices and click "Save".

If you make the number of classes more than the number of listed teachers then dummy classes will be created with the teacher code ZZZ. Once the teacher/s for these class/es is known, the ZZZ codes can be replaced in Curriculum > Classes > Define Class. A generated line allocation message appears where allocated already with the same name.
Using the "Delete these Lines" button will display a confirmation message checking that's what is intended, before deleting them.
Click on the "All" tab which conveniently displays all options for all year levels on one page.

Step 4. Student Allocation
The purpose of this page is to display how the timetable would look for automated student allocation to classes, with clashes (of students only) based on the Confirmed option lines from Step 3. The initial best-fit provided enables pinning and re-allocation until you're happy with it. "Pinning" a subject for a student (or group of) in a particular option line.

A student's classes can be edited by clicking the chevron beside the student's name to open up the list of available choices. A range of filters is available including year level, course, pinned, clash and allocation status. After class changes have been made, click "Allocate" to redistribute the student's classes.
- You can export the selected year level allocations, note the range of filters for "Show clashes only" or "Show under-allocated only", Pinned, Clash, Allocation Status and Course tabs. This can be reallocated as many times as you like, but only one final version.
- The percentage fit of students into their requested classes is listed, and unallocated students can be viewed for your proposed timetable, displaying a link to download a list of the students and courses that have not been allocated (in a .CSV export).
- Edit student classes using the list of all the courses the student has been approved to take within each option line. Any clashes the student may potentially have in that option line are highlighted as per the key. To remove a particular course from this student, click in the cell and the colour will change.

-
Click "Save changes" to apply this change. Click the chevron again to close the detail, and the change will be reflected in the table as a blank. If you wish to see which course had been changed, this is still visible in the expanded detail for the student, and now displays in a different colour.
Pinning
- Class totals are displayed to assist with balancing class numbers. To prevent a class being reallocated, click the Contacts icon shown here with number, indicating the number of students in the class, and the red pin indicates the class is pinned to the student.

- To pin ALL students in the class for that option line - in one class cell, press Ctrl+click to pin all the rest of the class as well
- For pinning an individual student's classes, click on the student's name (cell) and the Pin All or Unpin All popup displays for selection
- To pin the same class for all students, hold the Ctrl key and click the icon again
- Click on Year Level at the top when you're wanting to hold those pinned and re-allocate other classes across option lines.
- All pin functionality saves as you go.
After class changes have been made, click “Allocate” which reads the current option line and pinned classes, and generates students into virtual classes, re-distributing each time until the allocation process is confirmed when the student membership to classes has been applied.
For a student wanting to take a class which clashes due to insufficient incidences of the class, it is necessary to return to Step 2, Student tab.
- Displaying clashes Click beside the student name to expand the chevron which will display all the courses the student has been taken within each option line. Any clashes the student may potentially have in that option line are highlighted (see coloured key). To remove a particular course from this student, click in the cell and the colour will change
- Pin student options to an option line, or move a student between option lines for a better fit. Pinning holds those pinned and re-allocates other classes across option lines. Once you've built the timetable, you cannot modify here with all changes needing to be made in Step 7 Modify Timetable.
- Once satisfied, tick the "Confirmed" check box which takes you to the next step. Success messages display at the bottom of the screen.
Once you are happy with your allocations, click the Confirmed checkbox then move to Step 5 by either selecting "5. Make Timetable" from the dropdown, or clicking "Next".
Step 5. Make Timetable
This step generates the timetable. Before building the timetable please ensure:
- Subject classes are determined
- Student Allocation to subject classes has been allocated
- Subject classes placed on option lines
Once you have completed the above steps, you can choose to build the timetable.
If changes are made in previous steps, the timetable can be rebuilt by clicking the "Build Timetable" button again. For minor changes, these are edited in Step 7 Modify Timetable.
Step 6. View Timetable Clashes
Any clashes in the timetable created will be displayed.
Step 7. Modify Timetable
The Modify Timetable page provides the following tabs for viewing the timetable by either:
All, Year Level, Teacher, Student, Class, Location, or Band
To edit any subject class, click on it to edit the current data.
To add a class click 'Add Class' in the relevant cycle/period. If the timetable you are working on is the active timetable, you will need to click "Make Changes" and the "Add Class" buttons will be available as shown below.

The following describes the colours shown in the colour key at the top:
Added/Moved: Classes created by the option line settings configured in step 4 and step 5 that have been moved from the generated day period slot in step 8,
OR
Classes that have been added to the timetable in step 8 using the “Add Class” buttons.
Details Changed: Classes created by the option line settings configured in steps 4 and 5, but teacher or room details have been edited in step 8.
System Generated: Classes created by the option line settings configured in steps 4 and 5


To fully save your additions to the Modify Timetable page click through to Step 8 - Activate, and activate your timetable for the relevant dates. This needs to be done before moving to any other page in edge except for when you may open a page in a new tab.
Step 8. Activate
Calendar & Dates
In setting the start and end dates, set the date/s you wish the new or modified timetable to take effect.
When nominating the cycle day (eg. if applying a change and those take effect on a Thursday, ensure the first cycle day is '4'. To close school for a day (eg. inclement weather), change the open days in your calendar from the Setup menu. To nominate or change an event day (eg. sports day), change the event days in your calendar.
For more good practice with timetabling, see our Timetabling Tips article.
Looking for more answers? email support with your question.