Enrol Student
Student details are maintained in People > Students - The process for enrolling new students begins with searching for an existing record, or where there are no matches in the system, adding a new record.
How do I add a student?
-
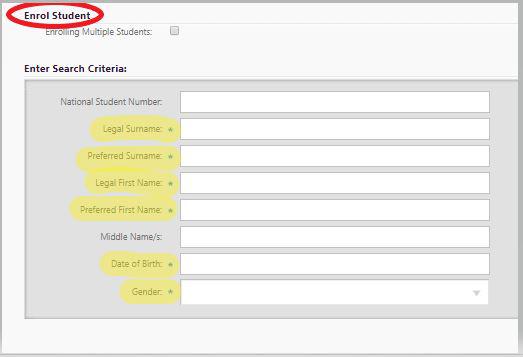
For enrolling a new student you'll need to complete the 'Enrol Student' fields. Navigate to People > Students > Enrol Student. Fields showing an asterisk are compulsory. These include Legal Surname, Preferred Surname, Legal First Name, Preferred First Name, Date of Birth and Gender.
- Click 'Search' to check if our database already has that student's data from a previous school
- If your student is already in the system or some details match, then you will be presented with options on the page (using a record or continuing with a new registration), otherwise the next entry page will open
(Ensure that you have the correct record before continuing. If the student is enrolled at another school, any editing you do will display at the other school).
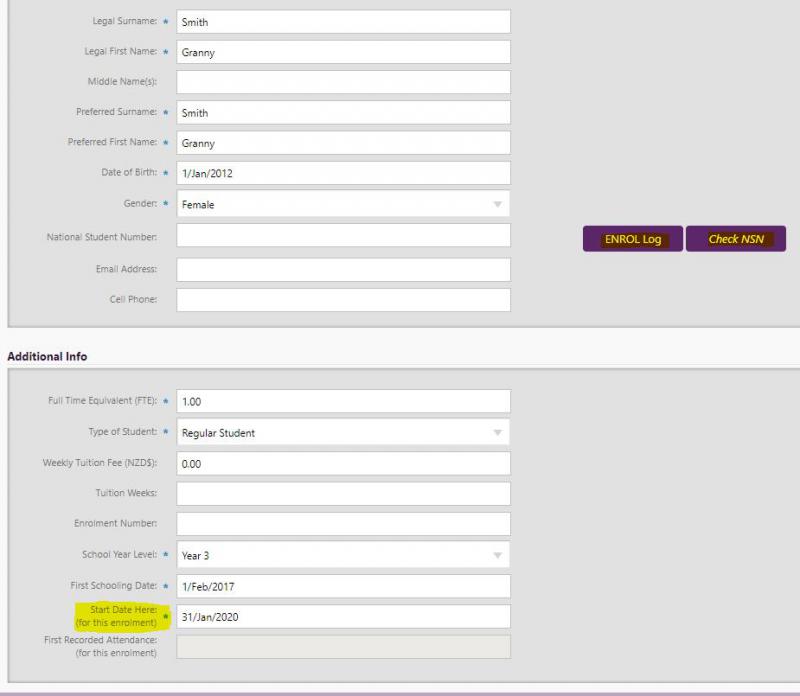
- If no match is found, more required fields and information will display, some already completed.

- To complete the General Information, check and add middle name if known - enter full personal details, NSN, MoE enrolment requirements and ethnicity.
- When performing a manual Get Check NSN there may be a mismatch between the first and middle names and the first names in Enrol records (Note: Enrol does not have a middle name field so all names are in the first names field). Selecting the Enrol version will update the SMS by placing all of the student's first names in the first name field. You can then move any middle names into the middle name field.
If middle names are in the first name field and you wish them to be in the middle name field, move the middle name/s into the middle name field, click 'Save Details' then click 'Check NSN' to validate the record with Enrol. Note: Instead of clicking 'Check NSN' you can wait for the overnight process, to validate the NSN and name fields.
- The ‘Start Date Here’ field determines their Enrolled or Pre-enrolled Status together with the relevant class(es) to display.
- At the bottom of the page tick 'Proceed to Edit Student' if you carry on with entering details on that student, or click Save to enrol another. Room and House can be added to individual students using the Group Membership tab.
- Note that if editing student details is required for compatibility with ENROL, see ENROL Issues tab from the Enrolments > ENROL > ENROL. See our ENROL videos.
- Student enrolment made in error - to delete the student

If a student has been enrolled in error (ie. never attended) and therefore is required to be deleted, their status may currently be Enrolled, or Leaver. Go to 'Start Date Here (for this enrolment) and change the date to a date in the future and save. This will make the record a Pre-Enrolment for you to remove/delete.
For more, see Removing a student who has never attended article.
Once a student has been enrolled there may be some fields already populated such as Gender, Ethnicity, Māori Language Learning Index, etc this has come through from the setup of Enrolment Default Settings (See Admin > Setup - Enorlment Settings)
Enrolled status - student has never attended:
- Navigate to People > Students > Student Details > Select Student > Group Membership, and remove any entries on the student by clicking the X to remove all memberships, and Save
- From the Student Details > Edit Student tab, 'Start Date Here' field - change to a future date, saving these details (and any required explanation) so the student then becomes a Pre-Enrol
- Navigate to People > Students > Pre-Enrolments student list and delete the student selected from there
Leaver status - student has never attended:
- Navigate to People > Student Details > Select Student > Group Membership, and remove any entries on the student by clicking the X to remove all memberships, and Save.
- From the Student Details > Edit Student tab, ‘Last Day of Attendance' field, change to a future date, saving these details (and any required explanation).
- Go to People > Students > Process Leaver and click on the 'undo' tab of the leaving record.
- If the student has any attendance currently recorded against them: Then go to Attendance > Mark Attendance, and blank out all the attendance marked on the student. You will need to wait overnight for the rolls to update.
- From the Student Details > Edit Student tab, 'Start Date Here' field - change to a future date, saving these details (and any required explanation) so the student then becomes a Pre-Enrol.
- Navigate to People > Students > Pre-Enrolments student list and delete the student selected from there.
Related Topics:
Removing a student who has never attended
ENROL Arrivers and Leavers Uploads
Looking for more answers? email support with your question.