End of Year procedures
Processing Leavers is the most time critical element in the End of year procedures. Also if you want Analysis from Achievement it must be done before the Leavers are removed. Writing off Donations and Publishing Reports are also recommended to be done before the end of the calendar year. All other things can be done at any time
- Print and Export any Achievement Analysis needed (particularly for leavers as they will dissappear in the next step)
- Process Leavers - This is best done after school is finished and before the end of the Calendar year
- Set up the Calendar for the new Year
- Adding and removing Staff
- Set up classes for the new Year
- Set up Timetable for Secondary and Area Schools
- Ensure all Reports are Generated and Published before the end of the Year
- Print and Export any Attendance data/ Analysis needed
- Print any Finance data needed
- Write off any donations still outstanding (after statements are sent)
- Set up new billable items for the new Year
Processing Leavers
-
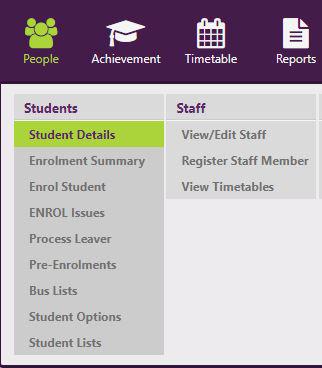
Students in their last year (by year level) at their current school are listed on the People > Students > Process Leaver - Final Year Students page. On this page their final day of attendance, and Reason for Leaving can be entered en masse ahead of time using the available drop downs, selecting the students and clicking ‘Update Selected’.
Process Leaver
The year level on enrolled students automatically increments once the new year begins. For Pre-Enrolled students, the year level does not increment in the new year, remaining at the level it was entered.
A student's status changes from Pre-enrolled to Enrolled once the 'Start Date here' matches the current date AND 'Present' attendance data has been entered.
If no class for the current year has been entered against an Enrolled student, (s)he will be listed under ‘Unassigned’ on the People > Students > Enrolment Summary page
- If a year level has not been entered against a Pre-enrolled student, (s)he will be listed under ‘Undefined’ on the People > Students > Student Counts > Pre-enrolled students page
Entering Classes/Teachers for the following year
Classes (Rooms) and their teacher(s) can be entered against students ahead of time. Once the start date for that Class (Room) matches the current date, the student will appear on the relevant teacher’s roll.
To add single students to a future class:
-
People > Students > Student Details > Group Membership > Next Year (ie. the following academic year)
- Select a student then choose their room or class for the following year

To add students en masse to a future class:
-
People > Memberships > Define Class > Next Year (ie. the following academic year) > Create a new class
- Choose a Name, Room and teacher then click Save
- On the subsequent page select the class members using the provided filter.
Note: members can be quickly selected by choosing a year level for example then removing those from the list who are not members.
- People> Memberships > Class Lists
- Select (the following academic year) from the drop-down
- Click Print then click Open
For more on end of year including financial recording good practice, view our videos:
Looking for more answers? email support with your question.
Processing Leavers
-
Students in their last year (by year level) at their current school are listed on the People > Students > Process Leaver - Final Year Students page. On this page their final day of attendance, and Reason for Leaving can be entered en masse ahead of time using the available drop downs, selecting the students and clicking ‘Update Selected’.
Students who leave during the year:
To update leaver recording:
- People > Students > Process Leavers
- Complete the 'Leaving Details' box where all four fields are compulsory. Both NQF fields should read ‘No Formal Attainment’.
- Click into the ‘Last Date of Attendance’ field and enter a date or choose a date using the arrows and headings then click OK.
- Select a ‘Reason for Leaving’ from the drop-down.
Click 'Process this Leaver'.