Configuration
Before using finances in edge, the following need to be set up by a staff member with the Financial Officer user responsibility: Ledger Numbers (including unallocated credit); Billable Items, and the Request for Payment template. Finance Settings from the Setup menu affect publishing to the caregiver portal, and general finance settings (including Xero, POLi and Paystation integration) are located in the Finance > Configuration menu.
Creating my ledger numbers, including unallocated credit items
The financial functionality is available where the Financial Officer user responsibility has been assigned, for configuration enabling electronic receipt functionality and online caregiver payments, and contains the school's bank account details.
- Adding or removing ledger numbers
- Creating billable items
- Request for Payment Template
- Statement Template
- EzyPay payments
- POLi payments
- Accepting caregiver payments via Paystation
For online payments, you must enable caregiver access to student data in the relevant year level in the Admin > Setup > School Settings > Site Access section. In addition you must also complete details provided by the merchant which need to be saved when entered.
Click 'Save' to complete school settings.
For details on export to Xero, or export to Financial Manager, see our knowledge base articles.

The Finance > Configuration menu includes entering and maintaining ledger numbers together with setting up billable items, and designing the Request for Payment template. In addition to clicking ‘Help’, additional information appears within some of the finance pages in the relevant areas. Processes covered are:
create ledger number
billable item - create, edit or removal
ability to reverse (and/or transfer to different student) payments. See videos on these topics
payment tracking
Maintaining (adding or removing) a ledger number
-
If your school is linked with Xero, your view will be different for this area.
-
Create and save a new ledger number. Once saved, the description and GST component can be edited. The actual number can also be edited, however once edited, it’s important to note this will update the ledger number throughout the product (eg. Student Transaction Report exports and transactions already processed as well as billable items, ledger and batch reports)
-
The description is an optional field. This step is required before a billable item can be created.

-
Where a ledger number is no longer desirable to be assigned to a billable item, remove it using the X on the right side of the list on the Ledger Number page, although existing billable items retain the ledger number as it has already been assigned.
-
On the first occasion using financials, it is necessary to check the ‘Unallocated Ledger Number’ box and save the setting in order to allow any total of Unallocated funds for transfer to Financial Manager records.
Creating billable items
-
From the Configuration menu, in order to create a billable item, the ledger number must have been entered first to appear in the drop down for selection. Create the billable item based on the ledger details, adding the description and amount details.
-
A family based item can be created (usually for the school donation). Once selected by checking the 'Family Sized Item' checkbox, complete the table on the individual costs for families with 1,2,3 or 4+ students. A family is determined by having all of the same bill payers - this flag is selected when editing the student's caregiver details. Please note that Family based items will only calculate correctly and bill the eldest when charged to the whole school. If Assigned in any other way each student assigned will be charged the individual student cost.

-
Once saved, the billable items appear below, where they can be edited later from this list if required.
-
It is possible to use the same description more than once, selecting the ledger number from the drop down list when creating a new item, eg. changing the amount only.
-
Please note that to designate a billable item as 'single use only', the check box 'Single Use Item' must be checked, ensuring it is only possible to assign this billable item once to a student/group
Note: single use items can not be charged again to the same students the following year. You should set up new items each year to make writeoffs easier
-
If your billable item is likely to be a variable amount, eg. one or three pencils for stationery, this can be set allowing the figure to be entered on each occasion as appropriate.
-
On Save, a billable item can then be assigned to a student or students.
-
Billable items are automatically available for the next financial year.
-
A Billable Item can be deleted from the list - this means that it will not be available for selection on the 'Assign Billable Items' page.
-
A Billable Item can also be edited - both the Description and Amount.
This will not change any Billable Items that have been Confirmed for a student/group - only new ones assigned from this point.
For what's required in terms of end of the year processes, see our End of year financials video.
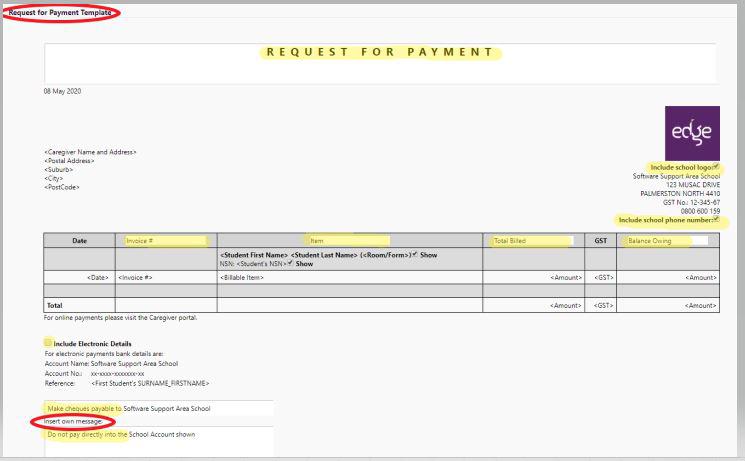
Request for Payment Template
-
The template created is displayed when a Request for Payment is to be sent out, and is only editable on the Configuration page by Financial Officer user responsibility.
-
The student ID is used on the template.
-
In order for the school bank details and GST Number to be displayed on the Request for Payment, these need to have been set up within Finance > Configuration > Finance Settings area.

-
You can insert customised text in the "Request for Payment" heading field, and white boxes on the template, e.g. “Please make cheques payable to ....”; “This payment is due before the end of term”.
-
You can insert the school logo,school phone number and include Electronic Details by ticking the 'Include school logo', 'Include school phone number' and 'include electronic details' boxes. Once the template is created click on save.
-
To prepare a request for payment now using this template, see 'Billable Items' navigation to first create and assign the billable item/s. A caregiver with no 'Bill Payer' status will not receive a request for payment.
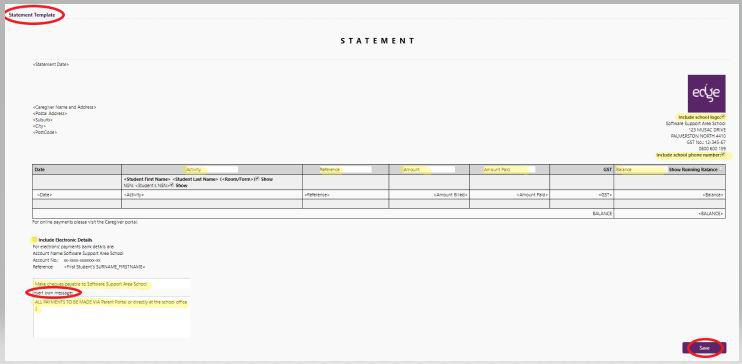
Statement Template
-
From Finance > Configuration > Statement Template, a statement can be set up (where you have the Financial Officer user responsibility). When generated, this lists all transactions on the (current or leaver) student's account between specified dates, with tick boxes for logo, school phone number and electronic details to be included in the template. Two fields also allow for customised content. For example 'Make cheques payable to....'. This template is similar to a Request for Payment, however the heading of Statement cannot be changed or altered.

-
To prepare a statement using the saved template, see Finance > Processing > Statements. Transactions can only be included if they occur within the date range selected. A caregiver selected with no 'Bill Payer' status will not receive a statement.
Getting started with EzyPay
EzyPay is an online payment gateway through which schools can enable caregiver payments using Visa or MasterCard, or their own bank account
EzyPay will provide you with an Account name, ID and Password which you will need to input on the Finance > Configuration > Finance Settings page.
false
Accepting POLi payments
For details on setting up the ability for caregivers to pay bills from their bank account through the Caregiver Portal (without the necessity for a credit card) see our Finance Online Payment Setup article which includes the steps for contacting Merco in the first instance, including enabling site access settings. For a demonstration, see How to use POLi video.

Accepting caregiver payments via Paystation
For details on setting up the ability for caregivers to pay bills using their credit card account through the Caregiver Portal see our Finance Online Payment Setup article which details the steps for contacting Paystation in the first instance, including enabling site access settings. Ensure that staff with Financial Officer edge user responsibility have valid email addresses, so that they can be notified of any issues.
Note: setting up accounts with POLi and Paystation are arrangements made by your school - and edge Learning Solutions is not involved in this part of the process.
the functionality will be visible at the bottom of the page. Enter the details obtained from Paystation.

From Admin > Setup > School Settings > Site Access, the caregiver access must be enabled to allow caregivers to use the functionality for paying online. Caregivers must also be Bill Payers to make payments in the Caregiver portal.
Looking for more answers? email support with your question.